Tonight while caulking under my bathroom sink I learned a very very important lesson in Kitten Monitoring! Because a quiet little kitten can very easily sneak up behind you while you are working and step onto a paper towel FULL of caulk!
And my sweet, little, pink nosed kitten did just that this evening! Biscuit ended up very cranky with a caulky back foot. He is a former stray kitty who really does not like being picked up. Loves having his head rubbed, but NOT picked up! So being picked up, held, and having his foot scrubbed pissed him off.
Fortunately, I have lots of kitty treats and he has since forgiven me!
Oh yeah, why was I caulking the bathroom? Because this morning I discovered that my sink was leaking and had made the wood below all soggy. I had to rip up the tile I put down, bleach and dry out the wood, and then retile. Fortunately, it had not been leaking very long so I didn't have to rip out the wood. That would have sucked!
Splurge! Argh!
I'm weak!! *sighs* Well.. sort of. I've been eyeing these OXO Good Grips canisters for my dream pantry makeover since I saw them on Pinterst weeks ago. But dear lord they are expensive! $100ish for 10 canisters. And then the separate ones are $9-15. Ugh!

But then the skies parted, angels sang, and I found two sets at Ross! They were still a bit much, $70 for each set and they have black lids instead of the white I originally wanted, but not being picky! I can't wait to put my shelves together tomorrow after work so I can start using these. :D

But then the skies parted, angels sang, and I found two sets at Ross! They were still a bit much, $70 for each set and they have black lids instead of the white I originally wanted, but not being picky! I can't wait to put my shelves together tomorrow after work so I can start using these. :D
Success! Err... sort of.
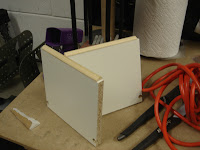
Last night my boyfriend and I start the pantry shelves. He got to use our new electric sander while I cut and glued the trim onto the front of the shelves.


We let the trim sit over night and then today I got to paint!


Bleeeeeeaaaargh!!
That is the official sound of the last two weeks. Bleeeeeeeaaaaarrrgh! Followed by lots of coughing and sniffling. First we had the flu (which was really icky) and then we had bronchitis. Unfortunately, I infected my boyfriend, so that we could be miserable together! I think he was a bit worse off than I am to be honest..
So, the year has not started off so well, but I am determined to turn that around! Lately I feel like the Queen of Unfinished Projects. I have about 20 things started and nothing finished. Our bathroom is still stuck in the half painted state it was before we got sick. The pantry shelves are sitting, unpainted, in the garage. We bought and put up curtains in the master bedroom, but I think I hate them. >.< etc etc etc!
However, I have today off and I am determined not to spend it napping on my sofa and getting things done!
Which is why I am currently sitting on the sofa.
Damn comfy sofa.. it's so nice.. ahhh.. We splurged when we purchased it after moving in together.
Ahhhh sofa..
Ok! Ah! Motivate! This is my list that I would like to accomplish today:
1 - Finish painting the Master Bathroom.
2 - Paint the pantry shelves, install, and organize the pantry.
3 - Put up curtains in the dining room
4 - Do my laundry (ugh)
But first, off the sofa! Baby steps..
I love Scrabble!
And I love my boyfriend more. <3 So when I saw this, I thought it was perfect! Except for the price. Almost $100 in US currency!
Love You Scrabble Tile Artwork
I bet I can make that myself! I looked into buying some scrabble tiles, but all I could find were icky plastic ones. So I figured that I could make those as well. I found a slightly damaged shadowbox at Michaels, on clearance for $4. I was looking through my piles of scrap wood in the garage and I saw that I had a ton of leftover paint sticks! Free and just the right size to replicate a Scrabble tile on. So I used my little mitre box and a handsaw and started cutting out my tiles.


I sanded the edges and corners to make them look a bit more worn, like real game tiles. Then to start the lettering! I found a picture of some Scrabble tiles online and printed out the entire alphabet. I picked out the letter that I needed and then rubbed pencil lead all over the back of the image. Then ai put each letter onto the tile and drew over the letter to transfer them onto the tile. Then I went over the transfer with a permanent marker.


The shadowbox I had found at Michaels had a fuzzy back to it, so I put little bits of velcro onto the back of each tile and positioned them in the shadowbox. After it was all done I decided to paint the box black. :)

So, here we go! For $4 (the price of the shadowbox) I replicated what would have cost me $100. It was fairly simple and only took about an hour. And it combines my love of board games and my love of my boyfriend. And that is pretty awesome. :)
Organize! Organize! Organize!
Another tip from Pinterest! :D I think 99% of the things I'm doing around here are from there.. My coworker and I think Pinterest was secretly thought up by Lowes and Michaels as a way to get women into more home crafty things! ;)
Anyway, today's project was organizing the bathroom a bit. I can't remember which site I saw it on, but there was a tip saying that you could use sticky floor tiles under your sink to protect the wood from any shampoo or lotion drips. And then it would be easier to clean. So I went over to Lowes and bought a box of self-sticking floor tiles. They are very easy to install, just peel the paper off the back and stick! You can cut them (carefully!) with a razor blade.


The pullout bins were from Bed, Bath, and Beyond. They are nice to sort things into. After under the sink was all done I started organizing my drawers. I got the plastic drawer organizer from Target. Now all my hair clips, pony tails, etc have a home!

I used more peel and stick tiles under my kitchen sink, to help protect from any goopie dribblings in the kitchen. :)
Anyway, today's project was organizing the bathroom a bit. I can't remember which site I saw it on, but there was a tip saying that you could use sticky floor tiles under your sink to protect the wood from any shampoo or lotion drips. And then it would be easier to clean. So I went over to Lowes and bought a box of self-sticking floor tiles. They are very easy to install, just peel the paper off the back and stick! You can cut them (carefully!) with a razor blade.


I used more peel and stick tiles under my kitchen sink, to help protect from any goopie dribblings in the kitchen. :)
Mirror.. mirror.. on the wall.
Who has the cheapest looking mirror of all? We do! :D Yay contractor grade building materials. Fortunately, in walks Pinterest, with all kinds of suggestions on how to make them look nice. Did you know that you can glue trim onto the mirror itself? And not have to take it down and replace with a big honkin' expensive mirror. Really! And it's eeeeeeeeasy!
Here is a picture of our downstairs bathroom before. It's not terrible, but it's really not exciting!

First, measure your mirror. Then go to Lowes or Home Depot and check out their trim department. Both store will cut the wood for you. My store only does straight cuts, so I added an extra 2 inches to each measurement so that I could futz with the angled cuts at home.

It took a lot longer for me to do those cuts because I was using a mitre box and sawing them by hand and the trim that I picked was made of MDF which is way tougher than just wood planks. Lesson learned!


I used a bunch of Liquid Nails on the back of each board and stuck it to the mirror. Make sure that you don't go too close to the edge otherwise you will see it in the reflection in the mirror. I held each piece in place with a crapton of tape overnight and then Tah-dah!

Less ugly giant mirror in our bathroom. :) It was fast, easy, and cost about $30 to do. I think I'm going to do our guest bathroom next.
Here is a picture of our downstairs bathroom before. It's not terrible, but it's really not exciting!

First, measure your mirror. Then go to Lowes or Home Depot and check out their trim department. Both store will cut the wood for you. My store only does straight cuts, so I added an extra 2 inches to each measurement so that I could futz with the angled cuts at home.

It took a lot longer for me to do those cuts because I was using a mitre box and sawing them by hand and the trim that I picked was made of MDF which is way tougher than just wood planks. Lesson learned!


I used a bunch of Liquid Nails on the back of each board and stuck it to the mirror. Make sure that you don't go too close to the edge otherwise you will see it in the reflection in the mirror. I held each piece in place with a crapton of tape overnight and then Tah-dah!
Less ugly giant mirror in our bathroom. :) It was fast, easy, and cost about $30 to do. I think I'm going to do our guest bathroom next.
I need more space!
Even though I took over the larger side of the bathroom, I still find that I always have clutter on my counter. So this weekend I came up with an idea on how to get a bit more space. Go up!
I had an old Benno DVD tower from IKEA that was just sitting around. It looked like it was the same width as the little counter wall area between my vanity and the tub. So I did some measuring and then started cutting the Benno down to the right size.

I needed one leg to be a little longer to help balance (that will make sense later!) on the ledge. After I had it all put together, it looked a bit plain. So I went to Lowes and got 2 pieces of trim, for about $8. I carefully cut the trim using a mitre box and handsaw to fit along the edges and then glued it down with Gorilla Wood Glue.


I left a gap at the top of the of the DVD tower to put the molding, which I cut using my dad's saw. You can cut it with a mitre box and handsaw, but the molding I had was made of MDF and takes forever to cut by hand! I used more Gorilla glue and some small finishing nails to attach the molding. Then covered the nail heads and corners with wood putty.


I cut some extra, much thinner trim to put along the fronts of the shelves. Then I sanded and painted the whole thing.

And this is what it looks like in my bathroom! It easily holds all of my bubble baths, mouth wash, and other counter top bottles.

(Please ignore the unfinished painting - I meant to get it done last week but got bronchitis instead!)
So, now you can see why on leg is longer! It helps with extra balance and does not allow the tower to get bumped off the ledge and into the tub. haha. Because that would suck. Once I am all done painting and adding trim to my mirror I will screw the tower to the wall.
I had an old Benno DVD tower from IKEA that was just sitting around. It looked like it was the same width as the little counter wall area between my vanity and the tub. So I did some measuring and then started cutting the Benno down to the right size.

I needed one leg to be a little longer to help balance (that will make sense later!) on the ledge. After I had it all put together, it looked a bit plain. So I went to Lowes and got 2 pieces of trim, for about $8. I carefully cut the trim using a mitre box and handsaw to fit along the edges and then glued it down with Gorilla Wood Glue.


I left a gap at the top of the of the DVD tower to put the molding, which I cut using my dad's saw. You can cut it with a mitre box and handsaw, but the molding I had was made of MDF and takes forever to cut by hand! I used more Gorilla glue and some small finishing nails to attach the molding. Then covered the nail heads and corners with wood putty.


I cut some extra, much thinner trim to put along the fronts of the shelves. Then I sanded and painted the whole thing.


And this is what it looks like in my bathroom! It easily holds all of my bubble baths, mouth wash, and other counter top bottles.
(Please ignore the unfinished painting - I meant to get it done last week but got bronchitis instead!)
So, now you can see why on leg is longer! It helps with extra balance and does not allow the tower to get bumped off the ledge and into the tub. haha. Because that would suck. Once I am all done painting and adding trim to my mirror I will screw the tower to the wall.
Tired.. Sore.. and Covered in Drywall!
Last weekend I decided that it was time to work on our Master Bathroom.


Please excuse the mess, I had already started taking things out of the medicine cabinets, etc. Anyway, this is our bathroom before. It's really nice, I just was not a big fan of the color. The walls are beige, tiles beige, etc. I wanted something a bit brighter, so I picked Sherwin WIlliams Balmy. It looked like a nice blue on the color sample, so I decided to go for it and bought a gallon.
First and ONLY time I will ever buy a gallon of paint without first buying a sample and testing it on the walls! It was bluuuuuuuuuuuuuue! Super blue. So blue that my boyfriend said "Wow.. that's blue!" and usually he's ok with any color I pick. haha. Back to Lowe's for a lighter shade and it was perfect!

This color is called Sherwin WIlliams Snowdrop. And I looooooove it! My mom had given me the paint swatch, but there wasn't a SW near me. Fortunately Lowes will color match it for you as long as you have the number code or color name. They can look it up in their paint directory.
I also learned they can look up other things, like sports teams. The paint guy was telling us he could look up the Packers and find their exact team colors. My mom tested him and had him look up Ohio State. haha. Which they had! :D
As I was painting around the room I came across our ugly towel bar. They are ceramic wall mounts with a plastic bar. Putting more than one towel on it makes the plastic part start to bow.. And did I mention they are ugly?

So it had to go! I started off by using a razor blade to score around the base of each wall mount to loosen the glue that was holding them in place. Then I took a small screwdriver and a hammer and gently pried it from the wall. They actually came off much easier than I expected! I had googled how to remove them and came across a bunch of stories of people having to break them off the wall. But mine came off easily. And fortunately whoever installed these was nice enough to leave a chunk of drywall stil attached to the wall.

Fortunately, my super awesome parents left us a nice piece of drywall when they were over last time helping us fix another wall. So I used the piece from the hole as a template to cut 3 more pieces. I took some Liquid Nails (lots and lots of Liquid Nails) and glued a shim across the back of the hole in the wall. This was going to be used to keep the filler piece of drywall in place.


While it was drying I clamped the shim in placed with a handy clampy thing from my dad and went to work removing the bar above the toilet. :) I let the glue dry for about an hour, then fitted the filler pieces of drywall into the holes and covered with spackle.

It's pink and dries white :D
And that is where the project is at for now. Going to be doing a lot of sanding, more spackling, more sanding, etc tonight.
Subscribe to:
Posts (Atom)